
Update: The original website with its digitally-altered ‘miniworld’ pics seems to have been taken down. I’ve constructed a few of my own ‘miniworld’ pics to give the reader an idea of what I’m talking about:


From now on, I save an archive of all photos I use from the internet!
While stumbling through the ‘tubes the other day, I came across a very cute series of photos, an example of which is pictured below:

Is it a picture of a real place, or a picture of a miniature model? All the pictures are apparently of real places, digitally modified via Photoshop to make them look tiny! If you are skeptical, you can see the original picture of Stonehenge in the snow here, and what looks to be the original of Tokyo Tower here.
I’m not a digital photo expert, but it looks like a number of ‘tricks’ were used to make the pictures look miniature, including the simple psychological effect of always having views from above. The most significant modification, though, is of the focus: in the modified pictures, the foregrounds and backgrounds are out of focus, and this alone can fool the eye. Why is this?
This effect is a clever exploitation of the concept of depth of field, and its related ‘cousin’, depth of focus. I thought I’d do a short post about the idea (my friend Personal Demon suggested the topic months ago, actually) and the related mathematics. Along the way we’ll introduce a few simple lens topics from geometrical optics.
Without going into too much detail, according to the theory of geometrical optics, in free space light travels along straight line paths called rays. One can see how this idea came about: light passing through gaps in a cloud or through gaps in the foliage of trees appears as a continuous line of light.
A lens can be used to focus light through the process of refraction. Light rays passing through the glass of the lens are deflected at different angles depending on the angle at which the ray approaches and the thickness of the glass at the point of entry. For instance, the image below shows the effect of a lens upon a collection of parallel rays:
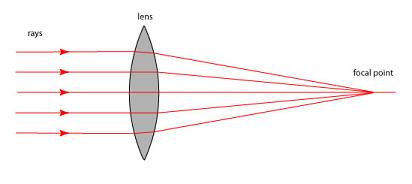
For our purposes we only need two numbers to characterize the properties of a lens: its focal length 


The distance at which a lens forms an image is characterized entirely by the aptly-named thin lens equation, given by

where 

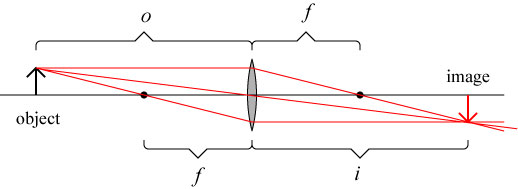
For this example, the object is placed at 


The thin lens model can be used to understand the operation of simple cameras and the human eye. In a camera, a lens (or, usually, a system of lenses) projects an image onto photographic film or a CCD sensor. In the human eye, a lens projects an image onto the retina in the back of the eye, where the image information is converted into neuron signals:

It is to be noted, however, that the thin lens equation suggests that every object distance is imaged to a different image distance. In other words, the image of an object which is 15 feet away will appear at a different location behind the lens than the image of an object which is 10 feet away. If a camera (or an eye) is to be useful, it must be able to image objects at different distances. In a camera, one can adjust focus by changing the distance between the lens and the film; in the human eye, muscles in the eye change the focal length of the lens by distorting its shape.
What happens if our film (or retina) is not placed at the ideal image distance
We may also ask what happens to the images of objects which are not located at the ideal object distance
We can summarize both this ideas as follows:
1. Depth of focus. For a given object distance
2. Depth of field. For a given image distance
Both of these concepts are illustrated below.

The ideas of depth of focus and depth of field both concern the ability of an image-forming device to make sharp images, but under different circumstances. When we are focusing on a single object and want to know the range of positions within the camera which are effectively in focus, we are referring to depth of focus. When we are imaging a collection of objects at different distances and want to know how many of these objects will be in focus at a given image plane, we are referring to depth of field.
Neither of these concepts are ‘absolute’ properties of an imaging system: they both depend on the resolution requirements at the end of the system. For instance, a high-resolution digital camera requires its images to be in much sharper focus than my 20/200 near-sighted eyes do. A point object which is being improperly imaged will produce a circular spot, rather than a point image, as illustrated below. It can be seen that the object on axis at A will produce a point image at the point I; the object on axis at B, however, will produce a point image at an earlier location. At I, object B produces a circular spot. It is important to note, and one can see from the diagram below, that the size of the circular spot depends upon the size of the lens aperture (

We define the circle of confusion as the largest diameter circular spot we are willing to tolerate in our imaging system.
Now we can do some math to quantify these concepts! We’ll restrict ourselves to studying depth of field, as it is directly relevant to the ‘miniature’ pictures listed earlier. Let’s start by looking at the behavior on the imaging side of the lens, as shown below:
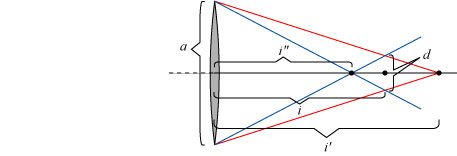
The lens is taken to have an aperture 


Now we can transform this to the object side of the lens; we have the corresponding figure:
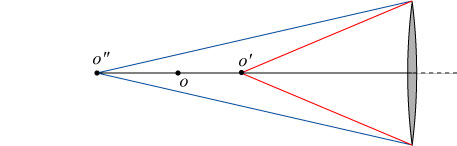
It is to be noted that 


where 

What can we learn from these formulas? The formulas for

This distance is known as the hyperfocal distance. When a lens is focused at or beyond the hyperfocal distance, everything beyond that distance is always in focus. Herein lies the key to understanding the ‘miniature’ pictures mentioned at the beginning of this post. When we focus our eyes on an object that is extremely close to us, we have a relatively narrow depth of field: objects immediately in front of and behind the object we’re looking at are out of focus. When we focus our eyes on a distant subject, we are looking past the hyperfocal distance and see almost everything in focus. Incidentally, one of the things that happens when you turn a digital camera onto ‘landscape’ mode is that the focus is set at or beyond the hyperfocal distance.
Though you probably don’t consciously realize it, your brain is taking some of its distance cues from this depth of focus behavior. The ‘miniature’ pictures help make big objects appear small by simulating a narrow depth of field.
Can we ‘fake it’ the other way, and make miniature objects appear larger? In principle this could be done by taking pictures of miniatures with a pinhole camera. I’ve talked about the image-forming abilities of the camera obscura in a previous post; a figure of this is shown below:

The image of a camera obscura (or, with film, the pinhole camera) is created by simple geometric projection. A perfect image is formed regardless of object or image location relative to the pinhole, which means that the pinhole camera has infinite depth of focus.
Of course, if you try to use a pinhole camera to make a miniature scenery look real, you had better have some extremely well-detailed miniatures!


That’s a pretty cool effect. Some of the photo’s come out looking better than others, the better ones appearing so much like miniatures that you really have to take a closer look. The explanation was also really well done. In fact, it could probably be understood even without the mathematics, but it makes for a more comprehensive explanation for those who are willing to follow it.
Cool. I’ve seen pictures like this before; I think the ones with people are more recognizable as real because it’s difficult to get miniatures with realistic body proportions and poses.
stuwat wrote: “In fact, it could probably be understood even without the mathematics, but it makes for a more comprehensive explanation for those who are willing to follow it.”
Part of the reason I included the math was that it forced me to actually do the calculations myself!
Tom wrote: “I think the ones with people are more recognizable as real because it’s difficult to get miniatures with realistic body proportions and poses.”
For me, the most obvious ones are the ones which show too much, e.g. the first one. When you can see for miles into the distance, it’s hard to imagine a miniature of that size being constructed.
Dr. Skull wrote: “Of course, if you try to use a pinhole camera to make a miniature scenery look real, you had better have some extremely well-detailed miniatures!”
…and a whole lot of light! Something that is implied but not stated in this article is that the more you reduce the diameter of the entrance pupil of the camera, the more less light reaches the focal plane. To take a picture through a pinhole, you have to either increase the illumination of the scene or use a longer exposure.
clearly you have not heard of the wonderful invention that is a tilt-shift lens. although this can be done in photoshop, the lenses do a better job.
http://en.wikipedia.org/wiki/Tilt-shift_photography
http://images.google.com/images?q=tilt+shift+lens&ie=UTF-8&oe=utf-8&rls=org.mozilla:en-US:official&client=firefox-a&um=1&sa=X&oi=image_result_group&resnum=1&ct=title
http://en.wikipedia.org/wiki/Perspective_correction_lens
sqd said: “clearly you have not heard of the wonderful invention that is a tilt-shift lens.”
Clearly I hadn’t! (This confirms my often-told joke about my work in ‘theoretical optics’: “As soon as it can be applied, I change topics.”) The tilt-shift lens is quite cool, though, and it’s now clear how it works.
PD wrote: “To take a picture through a pinhole, you have to either increase the illumination of the scene or use a longer exposure.”
Quite right. Even looking at a single aspect of photography such as depth of field, one realizes how many factors must be taken into account to make a well-crafted image. Aperture size, focal length, lighting, lens type and other factors all contribute, and are not necessarily independent of one another. This complexity explains why most of my photographs end up looking like a Yeti riding the Loch Ness Monster while being illuminated by a UFO.
Pingback: Micrômegas vai à praia (tilt-shift video) | 100nexos
Very nice explanation of the fucking depth of focus, now I finally got it!!
I think he explained it the best way to understand, I liked when the writer said I am not a digital photo expert. So, you did the best.
Pingback: Week 8 – LA – Delving deeper into the history of Photography – My reflective journal